
Docker for beginners

Rhuan Silva
Former Tech. Lead at XNV

Hello you all, in this article I’ll try to explain the concepts of Docker and how you can dockerize your app with no suffering, so leeeeeet’s go 🤓
Objective
The objective of this article is to provide you the actions needed to get an up and running application with Docker and docker-compose. You’ll also learn how to upload and download it from local registries and the almighty Dockerhub. Have fun.
Software Delivery
A bit about it
In the context of delivering Software we always follow some macro paths such as:

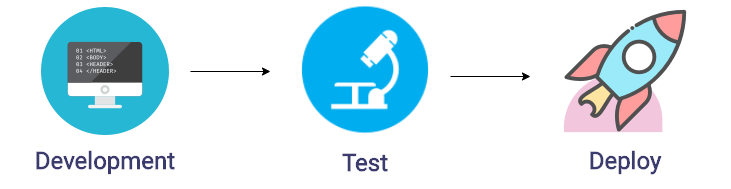
We always follow these steps. Now maybe you’re thinking “Oh no, no, no. The company I work for test everything in production, call me Chuck Norris“, and maybe you’re right, maybe I should really call you Chuck Norris. But anyways these macro steps represents a common scenario in each company. (Here I’m talking about manual tests ok? I’m supposing you’ve already done your homework by creating automated unit and integration tests).
So, now think about that, to implement this scenario we need a bunch of things right? We need a separate environment for each and this means that some DevOps Engineer will spend a lot of time preparing each of these environments with all the resources needed. Here is a small list of what we need for each environment:
- Development: we need a script to run the database, load the back-end dependencies, run the back-end, load the front-end dependencies and finally run the front-end. Ufff all because this is just a simplified version and I’m just thinking about a small web app.
- Test: we need a script the install all tools to run our small web app and also, we need to clean this environment right after each test because we don’t want it polluted for the next test iteration.
- Deploy: great, now that everything is working as expected we just need to connect via ssh in each environment that we have and stop the server, send the new bundle and restart the server again. Go horse, go! I must say that this is just a terrible solution, and please don’t do that. If you’re doing so, please finish reading this post and save some time to do other stuff that you probably can’t do now, like sleep.
Challenges in Environment Management
So, there are a few challenges that, sometimes, we face as developers (and testers), that are cultural. BTW, cultural challenges are the hardest in my humble opinion. I’m talking about problems such as not having the right credentials to manipulate each environment and debug or simulate the production environment, or the test environment. Sometimes we don’t have credentials to access the CI/CD tool and we cannot see the parameters used to construct our app.
Well, now talking about the technical problems. Sometimes we have a different timezone for each of our deployments, or maybe we must use environment variables and they’re all distributed in many machines and now you’re crying because you forgot to ask the sysadmin to update some specific variable in this tangle.
When this situation comes, my DevOps friends, what is the most common thing we all are tired of listening? I know you know it. C’mon… Exactly, that’s it:


If you didn’t heard this at least a hundred times, you’re not a DevOps Engineer, or maybe your team doesn’t need you, anyways let’s move on.
Vagrant
Vagrant is a tool for building and managing virtual machine environments in a single workflow.
Yeah, if you have already worked with Vagrant you probably know that things aren’t always easy as we think they are. Vagrant it’s a good tool, I must be honest about it, it can solve many problems with configuration files. I worked on a company that used Vagrant to scale and provision an infrastructure on AWS in 2015, sometimes I needed to do some fixes and some updates on it and it was hard to test everything locally, but it solved the problem at that time. I don’t know how Vagrant is nowadays but, before Docker, it was a good tool to solve the infrastructure provisioning problems.
LXC
LXC is a userspace interface for the Linux kernel containment features. Through a powerful API and simple tools, it lets Linux users easily create and manage system or application containers.
With LXC people started thinking about containers and how to modularize everything. I didn’t worked with it but we cannot talk about Docker without talking about LXC. At the beginning Docker was using LXC to communicate with the Kernel and nowadays it uses the libcontainer.
If you want to checkout why Docker is better than LXC, please take a look at this post.
What is Docker?
Docker is a tool designed to make it easier to create, deploy, and run applications by using containers.
https://opensource.com/resources/what-docker
Docker is basically a tool that can provide to you an isolated environment with your bundle inside of it, easy to create, easy to maintain, easy to deploy (sounds too good to be true? keep reading and I’m sure you’ll be convinced). You can re-use this environment to build different ones and keep track of each modification.
What is an image?
A Docker image is a file, comprised of multiple layers, that is used to execute code in a Docker container. An image is essentially built from the instructions for a complete and executable version of an application, which relies on the host OS kernel. When the Docker user runs an image, it can become one or multiple instances of that container.
https://searchitoperations.techtarget.com/definition/Docker-image
We can say that we create the rules of the isolated environment and build an image for those rules and when we put this image running in one or multiple instances we call each instance a container.
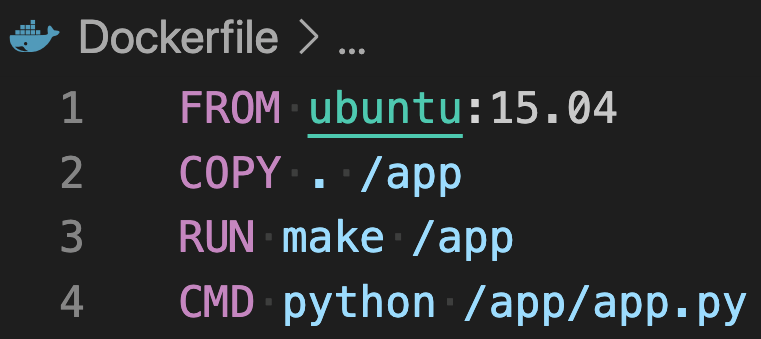
Dockerfile
A Dockerfile it’s a simple file in which you specify the resources that your image needs. You can share this Dockerfile, version it and upload it to a public registry like Dockerhub or to your own registry. Here we have a simple Dockerfile to build and run a python app:

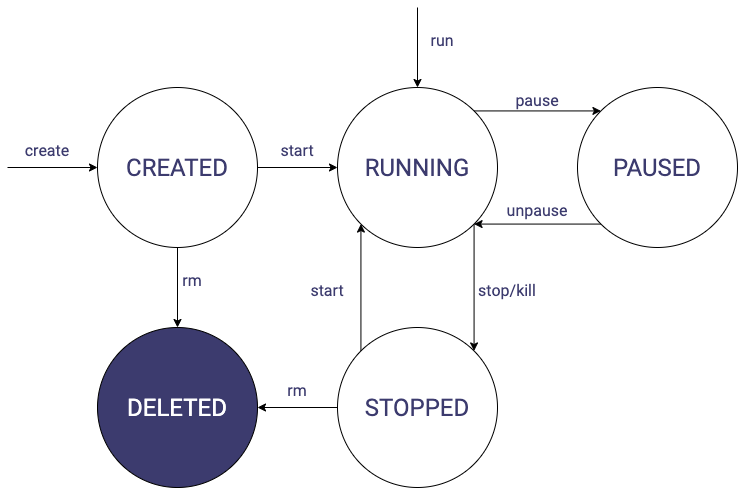
Container’s lifecycle

Creating an Image and running a Container
Ok, now that we know this all it’s time to build our image and run a simple container from it. To do that, I have a repository with a simple NodeJS app in it that I created to present docker last year, it only has a single endpoint. It’s a simple API and you can find it here: https://github.com/rhuankarlus/devfest_2019 so let’s clone this project and go on.
This small application needs MongoDB, so in order to continue you can download and install it on your machine (or you can just read this post until the end and I’ll show you a way of not installing it and get it running anyways). Now here’s our Dockerfile:


The first thing it does is to load the node:lts-alpine image from Dockerhub. After that we add the code in the folder api to the image inner folder /api and run the command to install all dependencies via npm. Then, we expose the port 3000 which is the port used by the API and this is important because if you don’t do so, the host machine wouldn’t be able to request this port when our container is running. The last and most important command here is to start the application, but note that this command is executed only when we put the image to run (creating a container).
Great, now to build the image we just need to run: docker build -t our-small-app:latest . Note that our-small-app will be the name of the created image and the . is the directory of our Dockerfile. When you run this command you’ll see something similar to this logs:


Great! Our image was built with no problems and now if we type docker images we can see our image on the list:


Now let’s try running this image, turning it into a container. To do so we need to also run our MongoDB application, but wait, I’m not gonna install that, instead of it I’m going to run a MongoDB image from Dockerhub too. Come with me:
Run the command docker run -d --name=database mongo and now you have MongoDB up and running.


Now, to run our app and link our app to this database please run docker run -it --link=database -e NODE_ENV=docker -e SERVER_PORT=3000 -e MONGO_DB_URL=mongodb://database/small_app_db -p 3000:3000 --name=our-small-app-name our-small-app and then you’ll get…


The API is running! Note that we also linked the PORT 3000 from the container with the PORT 3000 of the host machine, and we can grab data from it. So, now all we need is to ask anything to the /message endpoint. Let’s do it?


So far so good, check that who’s holding the configurations is the environment and you can control this environment the way you want. You can pass arguments to build the image and you can pass environment variables such as NODE_ENV to the container.
Registries and Dockerhub
A Docker registry is a storage and distribution system for named Docker images. The same image might have multiple different versions, identified by their tags.
A Docker registry is organized into Docker repositories , where a repository holds all the versions of a specific image. The registry allows Docker users to pull images locally, as well as push new images to the registry (given adequate access permissions when applicable).
https://wiki.aquasec.com/display/containers/Docker+Registries+101
As the text mention, a Docker Registry is a repository for your docker images. You can upload docker images there and they’ll be available for your team, simple right? Anytime you need to update the image you can change the version and upload a brand new one to the registry.
Running a local registry
In this tutorial we’re going to use this docker registry: https://hub.docker.com/_/registry

To do so, run this command on your terminal: run -d -p 5000:5000 --restart always --name our-reg registry and you will get a local registry running on PORT 5000, and don’t worry, if this registry goes down it will be automatically restarted because of the --restart always command. (P.S. you can see it running by typing docker ps in your terminal).
Uploading our image to the local registry
To upload our image to the local registry we need first to tag the image to the right namespace and then we’ll be able to upload it. To do that, please run the following commands:
docker tag our-small-app localhost:5000/our-small-appthis command will create another image with this name, you can check it by running thedocker imagescommand again.docker push localhost:5000/our-small-appthis command will upload the create image to your local registry.
From now on, we can remove our local image by typing docker rmi localhost:5000/our-small-app You can also remove the previously created image by typing docker rmi our-small-app
Downloading our image from the local registry
Ok, now that we have this image uploaded to our registry we can simply download it from there. To download your image you can simply run docker pull localhost:5000/our-small-app and then if you list the images you’ll see it there.
BTW, you can directly run your container without pulling the image before. I like to use WEB interfaces to check versions and the usage of my registries, and you are like me I recommend Portainer (https://www.portainer.io/).
Dockerhub
Dockerhub (https://hub.docker.com/) is a free registry (unless you want to create private images, right now the hub permit only one private image). Dockerhub offers:
- Repository – the repository itself to keep track of your images
- Teams and Organizations – you can organise credentials to access each image there
- Official images – there you can find the official images from big companies like Google, Microsoft, etc…
- Build – on Dockerhub you can share your github repository and it will build the image for you automatically on each
push - Webhooks – you can configure then here it’s quite simple.
I strongly recommend you to create an account there to test the next steps.
Running our application from Dockerhub
The first thing we should do in order to get it running from Dockerhub is to actually upload our app there, so let’s do it.
There’s no difference between uploading an image to Dockerhub and to a local registry, except for the namescape. The namescpae of Dockerhub for your private account is your own username (in my case rhuankarlus). This way I’m going to create my own image: docker tag our-small-app rhuankarlus/our-small-app and after that we can simply run docker login and do the push. Now to run it from Dockerhub we can run docker run rhuankarlus/our-small-app Pretty easy right?
Docker Compose
Compose is a tool for defining and running multi-container Docker applications.
Using Compose is basically a three-step process:
1. Define your app’s environment with aDockerfileso it can be reproduced anywhere.
2. Define the services that make up your app indocker-compose.ymlso they can be run together in an isolated environment.
3. Rundocker-compose upand Compose starts and runs your entire app.
Configuring our application with docker-compose
Inside the repository we’re using we have a file called docker-compose.yml and inside of it we find the correct configuration to load the database and the app linked to the database. Let’s take a look together?

Alright people, the first thing were doing here is defining our database service, we simply call the image from Dockerhub (mongo:latest) and we put it to run on PORT 27017 and after that we define our api-container based on our own Dockerfile. But this time we use the host PORT 3005 linked to the PORT 3000 inside the container. The api-container also depends on the database container so it will wait until this container is running to start, and when it start we send some environment variables to it.
Running our app with docker-compose
So, the big question is: how can I run it? It’s so simple that I’m afraid you won’t belive it, you can simply call docker-compose up in the file directory.
Conclusion
Alright folks, if you got here I really hope you understood the basics of Docker, Registries and docker-compose. Thanks for read this article and if you need anything please get in touch via linkedin. ✌🏻
THE BLOG
News, lessons, and content from our companies and projects.
41% of small businesses that employ people are operated by women.
We’ve been talking to several startups in the past two weeks! This is a curated list of the top 5 based on the analysis made by our models using the data we collected. This is as fresh as ...


Porto Seguro Challenge – 2nd Place Solution
We are pleased to announce that we got second place in the Porto Seguro Challenge, a competition organized by the largest insurance company in Brazil. Porto Seguro challenged us to build an ...
Adriano Marques
CEO at XNV

Predicting Reading Level of Texts – A Kaggle NLP Competition
Introduction: One of the main fields of AI is Natural Language Processing and its applications in the real world. Here on Amalgam.ai we are building different models to solve some of the problems ...
João Paulo Martins
Data Scientist XNV

Porto Seguro Challenge
Introduction: In the modern world the competition for marketing space is fierce, nowadays every company that wants the slight advantage needs AI to select the best customers and increase the ROI ...
João Paulo Martins
Data Scientist XNV

Sales Development Representative
At Exponential Ventures, we’re working to solve big problems with exponential technologies such as Artificial Intelligence, Quantum Computing, Digital Fabrication, Human-Machine ...

Rodolfo Egarter
COO @ Pluo

Exponential Hiring Process
The hiring process is a fundamental part of any company, it is the first contact of the professional with the culture and a great display of how things work internally. At Exponential Ventures it ...
Rodolfo Egarter
COO @ Pluo
Exponential Ventures annonce l’acquisition de PyJobs, FrontJobs et RecrutaDev
Fondé en 2017, PyJobs est devenu l’un des sites d’emploi les plus populaires du Brésil pour la communauté Python. Malgré sa croissance agressive au cours de la dernière année, ...
Adriano Marques
CEO at XNV

Exponential Ventures announces the acquisition of PyJobs, FrontJobs, and RecrutaDev
Founded in 2017, PyJobs has become one of Brazil’s most popular job boards for the Python community. Despite its aggressive growth in the past year, PyJobs retained its community-oriented ...
Adriano Marques
CEO at XNV

Sales Executive
At Exponential Ventures, we’re working to solve big problems with exponential technologies such as Artificial Intelligence, Quantum Computing, Digital Fabrication, Human-Machine ...
Rodolfo Egarter
COO @ Pluo

What is a Startup Studio?
Spoiler: it is NOT an Incubator or Accelerator I have probably interviewed a few hundred professionals in my career as an Entrepreneur. After breaking the ice, one of the first things I do is ask ...
Adriano Marques
CEO at XNV

Social Media
At Exponential Ventures, we’re working to solve big problems with exponential technologies such as Artificial Intelligence, Quantum Computing, Digital Fabrication, Human-Machine ...
Rodolfo Egarter
COO @ Pluo

Hunting for Unicorns
Everybody loves unicorns, right? But perhaps no one loves them more than tech companies. When hiring for a professional, we have an ideal vision of who we are looking for. A professional with X ...
Rodolfo Egarter
COO @ Pluo
Stay In The Loop!
Receive updates and news about XNV and our child companies. Don't worry, we don't SPAM. Ever.
